How to Add Auto Captions in Any Language Using VN App (Free Tutorial 2025)
Hello everyone! In today’s tutorial, I’ll show you how you can generate automatic captions for your videos using the VN Video Editor app. Whether you want captions in Hindi, English, Urdu, or any other trending language — VN makes it possible directly on your phone.
Most people don’t know that the VN app itself allows you to create auto captions for free. So, stay tuned till the end of this guide because I’ll also share a secret trick that helps you add stylish trending captions without watermarks — all inside VN!
Step 1: Install the VN App from Play Store
First, open your Google Play Store and install the VN Video Editor app. Once installed, open the app, and you’ll see a clean interface with a “+” button.
Tap on the ‘+’ button → New Project → select the video you want to add captions to. After that, click Next, and your video will appear on the timeline.
If you play the video now, you’ll notice it has no captions yet. Before we add captions, let’s make a few quick adjustments to enhance the video quality.
- Go to Filters → Adjust
- Increase contrast and tweak brightness for better visuals
- When you’re done, hit ‘Done’
Now your video looks clearer and more professional — ready for captioning!
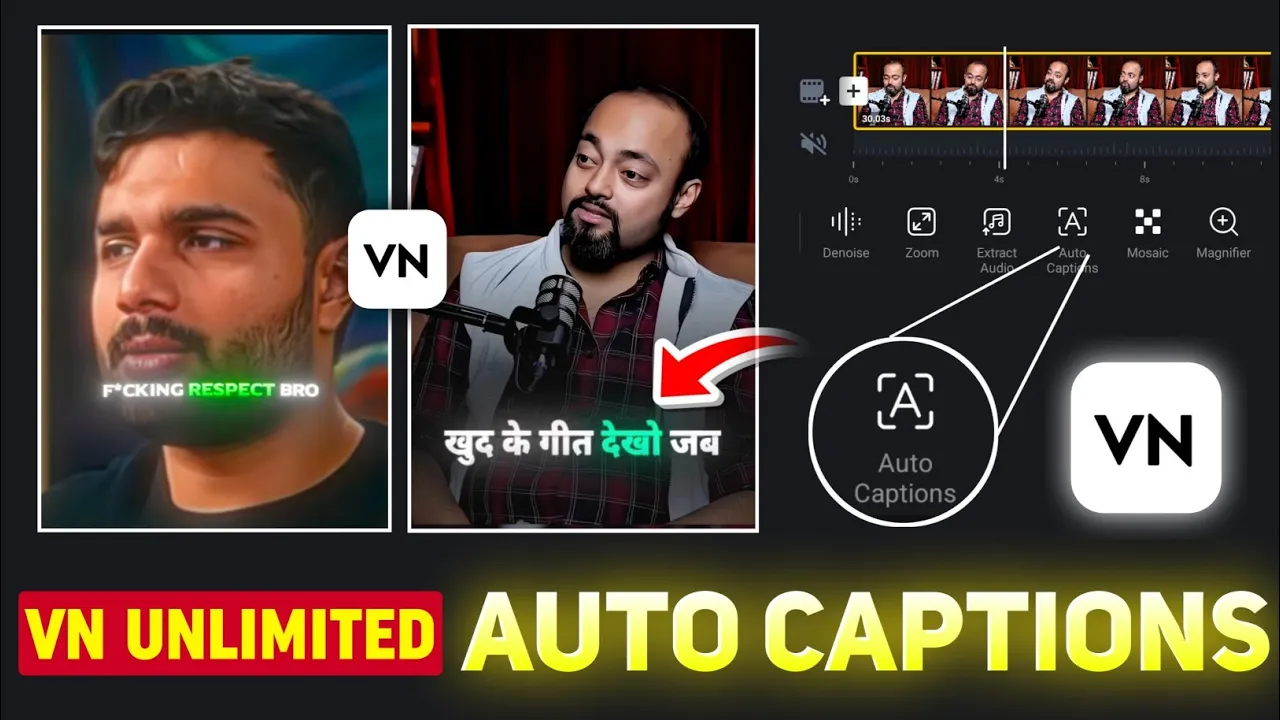
Step 2: Using VN’s Built-in Auto Caption Feature
Scroll right through the bottom toolbar until you find the option called “Auto Caption.” Tap on it, and you’ll see three caption models:
- Tiny
- Base
- Cloud (Premium)
The Cloud model provides the best results, but it’s only available in VN’s premium version. So, if you want a completely free method, select the Base model instead.
After that, tap on Language and choose your desired language — for example, Hindi. Then, hit Convert and wait a few seconds. VN will automatically generate captions for your entire video.
However, the problem is that the VN app’s auto-generated captions are often inaccurate — it may add random words or incorrect text. Also, the free version provides only basic caption designs.
Step 3: The Trick for Perfect Auto Captions
Here’s the secret method to add stylish, accurate, and watermark-free captions using VN and another app called ZMO AI Captions.
Follow these steps carefully:
- In VN, tap the ‘+’ icon → Photos → Stock
- Select a plain black image and stretch it to cover your entire video duration
- Now export the video (you can lower the quality since it’s only temporary)
Once exported, we’ll use another app to generate captions with AI.
Step 4: Use the ZMO AI Captions App
Go to the Google Play Store and install the ZMO AI Captions app. Open it, and you’ll notice some ads (since it’s a free tool).
Here’s what to do next:
- Tap on AI Captions
- Upload the black video you just exported
- Select the spoken language (e.g., Hindi or English)
- Tap Unlock and watch the short ad to proceed
- Finally, click Recognize and wait for it to generate captions
ZMO will automatically detect the spoken audio and generate perfectly synced captions with beautiful styles and emojis. The only issue is that it adds a watermark.
Step 5: Remove Watermark and Re-Edit in VN
Don’t worry — there’s a way to remove that watermark easily using VN itself.
- Reopen your VN project and delete the black layer.
- Tap on ‘Import’ and select the new ZMO video with captions.
- Resize it to fill the full screen.
You’ll notice the watermark, but you can hide it using VN’s Mask tool:
- Go to Mask → Rectangle
- Drag the mask to cover the watermark area
- Adjust the feather/fade setting for a smooth look
Now your video looks perfect — clean captions with no watermark!
Step 6: Make Captions More Visible (Optional)
If the caption text looks dull, you can improve its visibility by adjusting the video’s brightness and saturation.
- Tap your main video layer → Filter → Adjust
- Reduce brightness slightly
- Then, increase exposure and saturation for the captions
This will make your captions stand out beautifully on top of your video.
Step 7: Export Your Final Video
Once everything looks good, tap Export and choose your preferred quality — 1080p or 4K for best results. Your video will now have perfectly synced, stylish captions without any watermark!
That’s it! You’ve successfully added professional captions to your video using VN and ZMO apps.
Bonus Tips for Better Engagement
- Use bold colors and emojis in captions to attract more viewers
- Keep captions large and easy to read, especially for Reels or TikTok videos
- Experiment with trending caption styles using CapCut templates
If you want to explore more editing tools for your videos, check out these helpful resources:
- ZMO AI Tools – Free AI video and image tools
- VN Official Website – Learn more about VN features
- CapCut Online Editor – For more advanced effects
Conclusion
Even though VN’s built-in auto-caption feature is still basic, combining it with ZMO AI Captions gives you a powerful, free way to create stylish, multi-language captions for your Reels, Shorts, or YouTube videos.
This trick works great if you want professional-looking videos without spending money on premium apps or software. Try it once, and you’ll never need to manually type captions again!
Stay creative, keep editing, and share your happiness with the world!
Related Articles:
- How to Create Trending Reels Using VN App
- Top Free AI Tools for Video Editing in 2025
- How to Remove Watermarks from Videos (Free Tools)
Join Our Prompt Community!
Get daily AI prompts, tips, and tricks directly in your WhatsApp.