How to Create a Beautiful Wedding Invitation Video in CapCut (Step-by-Step Tutorial)
Hello everyone! How are you all doing? 👋 Today, I’ll show you how to create a stunning wedding invitation video for yourself or for someone else using the CapCut app. This method is simple, creative, and requires no professional editing skills. So make sure to watch (or read) till the end and follow along step-by-step.
What You’ll Need Before Starting
- A working version of the CapCut application (CPKT)
- A VPN app to access certain templates or effects
- Internet connection for downloading media
You can easily download a VPN from Google Play Store. Once installed, open it and tap on Connect. After that, make sure your CapCut app is up and running.
Also, if you haven’t yet joined our Telegram or WhatsApp community, go ahead and join now! We regularly share new templates, working app versions, and editing tips there. You’ll find all the important download links in the description box below.
Step 1: Start a New Project in CapCut
Open CapCut and tap on New Project. Select the base video you want to use for your invitation. I’ve provided a ready-made wedding background video—you can download it from the description link and import it into CapCut.
Step 2: Add Background Music
To make your invitation lively, let’s add background music:
- Tap on Audio → Sounds → Search.
- Type “Fluid” in the search bar.
- Select the first result and add it to your video timeline.
You can also explore royalty-free wedding music from Pixabay Music or Bensound.
Step 3: Add Lord Ganesha Image (for Indian Weddings)
Tap on Overlay → Add Overlay → Photo and select a picture of Lord Ganesha. Adjust the image size and reduce its opacity to around 10% for a subtle spiritual touch. I’ve shared the image link in the description box — feel free to use any Ganesha image that fits your theme.
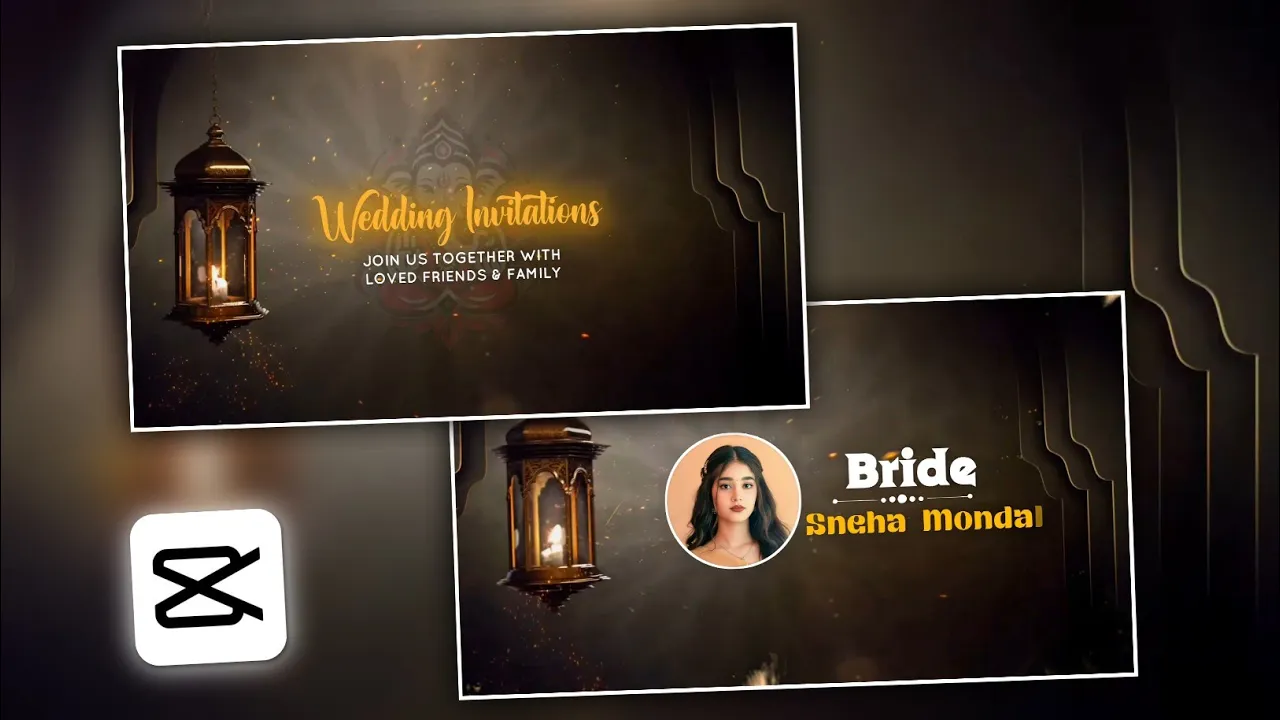
Step 4: Add the Main Title Text
Now, let’s write the heading text, such as “Wedding Invitation”. Tap on Text → Add Text and enter your title. Choose a calligraphic or elegant font from the font section. You can find beautiful free fonts on DaFont or Google Fonts.
Adjust the font color — yellow or golden shades work best for weddings. Then go to the Glow section and enable glow with medium intensity. Add a light shadow for depth and enable animation (for example, a “Fire” or “Shine” effect) to make the title more attractive.
Step 5: Add Subheading and Invitation Lines
Below your main title, add a smaller text line like:
“Join us together with love, friends, and family.”
Use a simple, readable font in white color. Keep it minimal and elegant. You can also animate this line with a smooth “fade in” or “type” animation for better engagement.
Step 6: Add Transitions
Now, to make your video more cinematic, add transition overlays:
- Tap on Overlay → Add Overlay → Video.
- Select a light or sparkle transition clip (link provided in the description).
- Expand it to fill the entire screen.
- Adjust color tone using the Temperature setting under Adjust → increase warmth to match your wedding theme.
You’ll notice a soft glowing transition effect that gives a premium look to your video.
Step 7: Add Bride and Groom Photos
Next, it’s time to personalize the invitation:
- Add the Bride’s photo as an overlay.
- Adjust position and size.
- Add a PNG decoration (like a floral or heart frame).
- Use the Text tool to add “Bride” or the person’s name.
Choose a creative “love-style” font (you can search “heart fonts” on DaFont) and add a soft “Star” animation. Repeat the same process for the Groom’s photo.
Step 8: Add Venue and Date Details
Don’t forget to mention the key details like:
- Venue: 24H Marriage Hall
- Date: 14th June
You can include this text below the names or in the final frame with a stylish animation. Keep it simple and legible.
Step 9: Add Final Animation and Export
Finally, add one last PNG decoration (link provided below). Use the “Page Unfold” animation to give a cinematic closing feel. Add two keyframes—one at the start and one at the end—and zoom slightly on the last keyframe to create a smooth zoom-out effect.
Once done, click Export and choose High Quality (1080p or 4K). Your beautiful wedding invitation video will be saved to your gallery, ready to share on WhatsApp, Instagram, or YouTube.
Final Thoughts
And that’s it! 🎉 You’ve successfully learned how to create a professional wedding invitation video using CapCut. This method is completely free, customizable, and can be used for any wedding theme — traditional, modern, or cinematic.
If you found this tutorial helpful, don’t forget to share it with friends and join our Telegram channel for more CapCut templates, effects, and editing tricks.
Stay happy and keep spreading smiles. See you in the next tutorial! 💞
Useful Links:
Join Our Prompt Community!
Get daily AI prompts, tips, and tricks directly in your WhatsApp.